




Monday, August 13, 2012

Crafty Sisters - Growth Charts


Hello! It's Candace and Nicole from Crafty Sisters!

We are happy to be able to pick this month's wyltc? theme, Growth Charts!  We have wanted to make growth charts for our kids for a long time.  They grow up so fast!


We were inspired by growth charts made by Petite Lemon and Ferm Living.
Our kids are animal lovers and these are perfect.

First we had Home Depot slice up a piece of 1/2 inch mdf, 12 inches wide and 42 inches long.
To create the pennant, we cut with a jigsaw a notch about 2 1/2 inches up from the bottom.
We also glued in grommets into drilled holes to create the official pennant look.


Nicole and her daughter picked what they thought would be my boys' favorite animals and cut the shapes out on 1/8 inch mdf.  They are so cute and the boys love them! We had fun naming all the creatures as we mod podged the papers on.

The majority of the paper we used is from the "Sweet Day" line by Echo Park.


We added a "grow" paper pennant to the top.  This would also be cute with your child's name, but since I have multiple boys, this will do.  We drew the numbers and lines on with a paint pen.


Nicole's daughter is a serious animal lover and especially fond of owls.  (They have owl boxes in their back yard and regularly spot visiting owls. )


Nicole cut and papered an adorable owl along with her daughter's name to go on her growth chart.
She used a cricut to cut the numbers and lines for the ruler along the side.   A vinyl ruler would also be a great option.
We are so happy with how they turned out and we especially love the smaller size.

Stay tuned for Wendy, Krystal, and Melinda's version of Growth Charts, we can't wait to see what they come up with!

Thursday, July 12, 2012

Personalized Crates from Craft Goodies!!!

Happy Thursday crafty friends!
Sorry for the tardiness of my post but life is crazy these days.
Wendy here today to share a bit of my organizational needs with you.
This theme is so very needed in my life these days, we just moved from Southern Texas back to the Pacific Northwest and my house is in desperate need of some organization because I'm pretty sure moving boxes don't count! I went for a pretty simple project today for a few reasons. One, because I do need them and 2, because all my tools are still packed, so simple it is!


So here's my plan: make a little crate for each of my girlies. Place said crates into the laundry room and fill with each little ones clean clothes. Holler at the little ones to come and get their clean clothes and then they magically disappear and return to the laundry room empty!
Cross your fingers it works...

Anyway, these would be so great for a playroom, the bathroom, a bedroom, even by the front door to collect shoes. And they are so much cheaper to make than to buy.
Here's what you need:
Pine 1x10 by 8 (that's enough for 4 crate ends)
5 gallon paint sticks (buy at Walmart or get for free at Lowe's/Home Depot)
**I used 16

Cut the pine board into 1 foot sections, you'll end up with 8.
 I then used a boring bit to drill two holes at the top and then my jigsaw to cut the rest of the channel to create hand holds. You can totally make these with out these. Or get creative-- drill two small holes at each end and tie a rope or ribbon for a handle, add store bought drawer pulls, what ever suits your needs!


Cut the paint sticks to the length you want your crates and then attach them to the side boards with nails and glue.
I used 6 on the bottom and 5 on each side, the spacing is just shy of 1/2 and inch on the bottom and 1/4 inch on the sides.


Once your crate is together, get personal!
I painted mine to match bedrooms--you know so they won't get lost from the laundry to the bedroom.
I typed out my daughter's name on the computer, adjusted the size, printed and then used that image to create a stencil with some contact paper. Applied the stencil and black spray paint.
My cri-cut would have been a WHOLE lot simple but it's still buried in a box somewhere.
And really, I think I like the paint better...


Only 4 more to go in my step to claiming one room of this house!
 Best of luck in your organization efforts
{and please feel free to send me a little bit of that, goodness knows I need it!}

Have a great weekend and happy crafting.

Wednesday, July 11, 2012

Wall Shelf - Crafty Sisters

Hello again from Crafty Sisters!
Nicole and I are so glad that Krystal picked the theme of "organization" this month for Wood You Like To Craft?
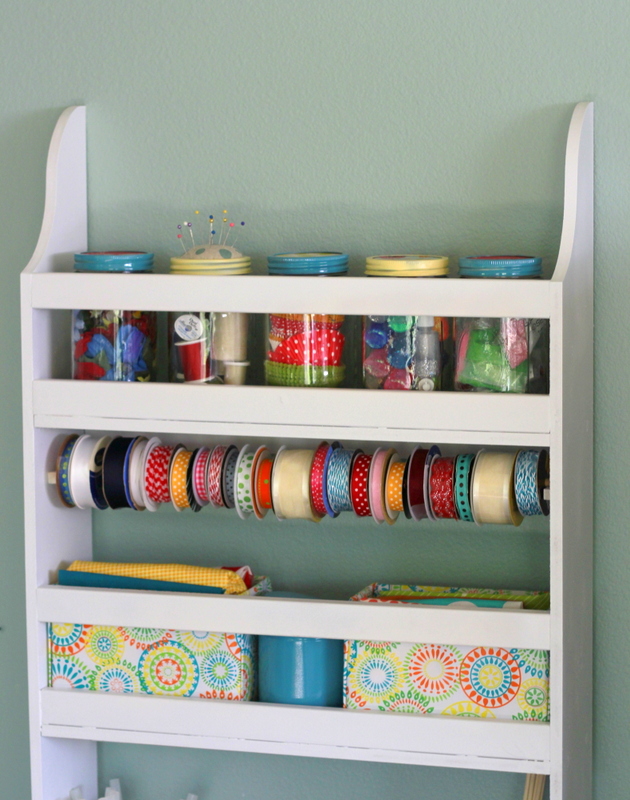
It gave me the inspiration to finish the shelves that have been sitting in my garage for the past two years!  I was also inspired by my husband's words as we cleaned out the garage that they might end up in the landfill if they are not finished. :)
 To build the shelves, I used the Flat Wall Bookshelf plans by the amazing Ana White.  The shelves are similar to the Madison wall shelf by Pottery Barn.

The shelves are built out of mdf, sliced to size by the nice guys at Home Depot.  I used primed mdf 1x2's for the front slats, although they do split very easily so make sure to pre drill everything that you can.  A countersink bit and lots of wood putty were great for the screws and holes.  I primed them 2 years ago and that's pretty much where I left off!
After a couple coats of spray paint and a new purpose, they were good to go!

Instead of displaying my children's books, I decided the shelves were the perfect size to hold my craft supplies. The shelves are narrow so it took some creativity to make the perfect containers.  I used mason jars with painted lids and papered tops to hold my small supplies.  I found that light bulb boxes and Costco graham cracker boxes were the right size too.  I covered each with cute wrapping paper for an easy fix.

I added a dowel above one of the shelves to hold rolls of ribbon.  I love it and it keeps all my crazy ribbons in order.  I have some fun plans for these two shelves in a crafting area that will hopefully be done soon!

Thanks for the great theme and inspiration Krystal!  A huge thanks to Ana White and her amazing plans she shares with us!

Tuesday, July 10, 2012

Under My Umbrella: Cork Board

Hey all!  It's Melinda from over at Under My Umbrella here to share my project for this month.  I'm all about  organizing things over at my house.  It seems like it's a never ending process with four kids :)  A while back I scored a huge frame with a broken mirror for free.   My daughter painted the frame to match her room and it's been sitting there as a frame for a while.   We decided to make it into a bulletin/cork board and this month's theme provided the motivation!


You'll have to excuse the quality of my pictures!  I'm using my phone again.   This frame didn't have a back board of any type so I created one.  I grabbed a piece of 1/4 inch thick wood and used my skill saw to cut it to fit the back of the frame.

The frame is pretty big so I had to piece the cork board together and glue it on to the back board.  I then used burlap to cover it so you couldn't see all those lines!


 I screwed the back board onto the frame and there you have it!  A cute bulletin/cork board for my daughter's room.  We now can take all the thousands of photographs she tacked to her wall and give them a home!  Organization always feels so good!


Monday, July 9, 2012

A Broom Cabinet- Organization Week

Hello there all my wood crafty friends!  It's Krystal from Sassy Sanctuary here today to kick off another week of Wood You Like to Craft!!  If you follow my blog you already know that I am expecting another baby in November, well one of the best things about being pregnant is the overwhelming desire to get your house in order. I decided to take advantage of the insanity and am declaring this organization week!  I'm so excited to see what clever things everyone comes up with!

For my project I decided to take care of a little problem that had been bugging me for months.... my mop and broom.  You see, we live in a split level house and the main level is all dark hardwood floor.  Because its dark it has to be mopped basically everyday.  Unfortunately there is no place to keep the broom or mop on the main level and I never would take the time to take it downstairs and put it away.  So they have been living in the corner of the kitchen.  But not anymore!  I took the only spare section of long wall in my kitchen and made a cabinet to custom fit my mop and broom!  I love it!


Its basically a glorified box with a door hung on the wall, but I love that everything now has a home!


And the front of the cabinet is chalkboard paint so it also serves a double purpose of being a place to write lists, notes, reminders, or menu plans.


Now I didn't take pictures for a step by step tutorial because if you want to make one you'll need to figure out what size works for your space and your stuff, and also because I had no idea what I was doing.  :)  But  I'll explain the process.

First you need to figure out what size you want your cabinet.  I knew I had a small space to hang it so I basically made mine as small as I could get away with.  Its about 5 feet tall, 14 inches wide, and about 6.5 inches deep, including the door.

Once you figure out your sizes then you basically build a box with an extra pieces on the back and an extra peice on the front.  Do this on both the top and bottom.

 
Then I added some molding to the top to give it a little extra something.


The door is also just a box with a piece off wood screwed to the back.  It is attached with simple hinges and has a knob and a "hook and eye" to keep it closed.


So that's the basic construction and then you can finish it however you like!


So that's my broom cabinet.  I have to admit to being really proud of it!  :)

Stay tuned for the rest of the great organization projects from the other members of the WYLTC team.  They always do amazing stuff so I'm sure it will be fantastic!

Thanks for reading!

Thursday, May 10, 2012

Yummy Bling from Craft Goodies!!!

Hi everyone!
 It's Wendy from Craft Goodies here today to wrap up the Summer Bling projects.

My first thought when you mention summer is "HOT" and since we've already hit the 80 + degree mark here in Texas I was drawn to cool comfort, in other words ICE CREAM!


I actually put this together while I was in Utah hanging with my sisters so there aren't any "how-to" pictures...but I can tell you what I did!
I started by drawing my ice cream cone out onto poster board. Then I cut it into separate pieces, the cone, the ice cream, the topping, and the cherry. Everything was traced and cut out of 1/2 inch MDF except the topping  and that was done in 1/4 inch MDF.
From there I painted base coats and then sanded down all the edges.
I used two small pieces of slat wood glued to the back to re-connect the cone and ice cream, stapled on a ribbon loop for a  hanger, and then flipped it over and added the details with puff paint and GLITTER!
Next, glue the choco topping piece into place, add a tulle whip topping poof and the top it with the cherry.
Done!
{Okay, almost done, give the entire piece a good coat of sealer to keep the glitter in place.}


Look! It's mint chocolate chip-
Happy Summer!


Wednesday, May 9, 2012

Garden Bird Stakes ~ Crafty Sisters

Hi again! 
We are excited that Melinda picked the theme of summer bling!
There's nothing like a little shimmer in the garden.
We found the cutest bird stakes on Pinterest from Foreside Home and Garden,
and thought they would be fun to recreate with wood.
We used pine scraps and bamboo stakes, so they were very inexpensive to make.
To give the birds some bling,
we used metallic paint and green rhinestones for the eyes.
Nicole cut the bird shapes out of pine on her scroll saw.  
To add texture, we used puffy paint to create scroll embellishments on the bird.
After the puffy paint dried, we gave the birds a couple coats of metallic paint. 
We used a tiny amount of brown paint to accent the puffy paint. 
To protect the paint from water, we sealed the birds with several coats of polyurethane. For the legs, we cut garden bamboo stakes and glued them into drilled holes.

We just love them, they are so fun and whimsical in the garden!
Thanks Melinda for the great summer bling theme!